
So if you've been keeping up with my posts, you probably have alot of questions regarding exactly what equipment I personally use to "record on a budget." In this article, I will go into detail about my home studio setup, as well as make recommendations to those just starting out. Continue reading to find out exactly how you can begin to build your very own home studio without breaking the bank!
Here's how to build a professional home studio for under $500
The first thing you must consider when building a recording studio is the medium with which you plan to record.
There are two main options: computers, and portable digital recorders. I personally recommend using a computer, because not only do most people already have access to one, but it is just simply easier to work with. Using a portable recorder, such as the
Tascam DP-03 Digital Portastudio, involves a much more complicated process and doesn't allow as much flexibility when it comes to mixing audio tracks in post production. If you record your audio directly to a computer or laptop, you can then transfer your tracks directly to your DAW (digital audio workstation) and begin mixing without having to transfer files via usb or firewire.
This brings us to my next point -
you need to choose a DAW software so that you can record and mix your songs. A DAW is simply a program that you run on your computer that allows you to layer audio tracks on top of one another and edit them to create songs. There are many different DAW softwares out there, and the best part is that alot of them are
completely free to download! The best free DAW's available now are
Mixcraft, Audacity, Cakewalk, Power Sound Editor, and Wavepad Sound Editor. All of these are programs are free to download and very user friendly. I personally think that Mixcraft is the best choice when it comes to free DAW's because it is the easiest software to learn with. If you are serious about recording, however, I recommend that you upgrade to a more profession software such as Cubase, Pro-tools or FL Studio. I currently use
Cubase, and I am absolutetly in love with it. It is very professional, although it does take some time to learn how to use. Cubase has definitely been one of the best investments I've made, and I highly recommend it to anyone who is looking to upgrade their DAW software.
Once you have your DAW downloaded to you computer and ready to go, you will need some sort of audio interface to record your music. Audio interfaces can be anything from a simple USB to XLR converter that allows you to plug a microphone directly into your computer to a full blown 24 channel multi-tracking computer interface.
However, for most of us, something in between will do just fine. I am currently using the
M-Audio Fast Track Ultra, which is a fairly simple 6-channel multi-tracking interface that uses a USB cable to connect to my computer. This little piece of equipment is my pride and joy - it can record up to 6 different sound sources all at the same time into individual tracks on my DAW. This is extremely useful for someone like me, who needs to record entire drum kits. However, alot of you who are reading this article will not need this many channels at first!
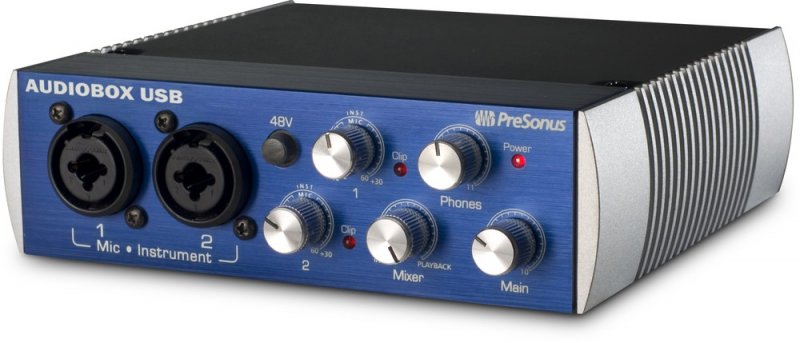
To start out, I'd recommend the PreSonus Audiobox. This is basically does the same exact thing as the Fast Track Ultra, except it is only 2 channels, which should be plenty for anyone just starting out. Plus, it's half the price at only $150 dollars!
After you have your audio interface, it's time to get some microphones for recording. The first microphone to buy would be a standard dynamic mic.
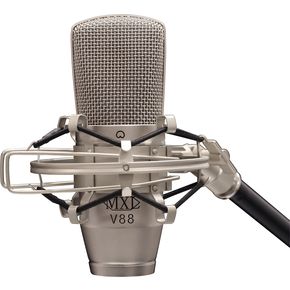
I recommend the Shure SM48. It is the cheaper version of the infamous Shure SM58, but I can tell you from personal experience that it is no less worthy! I have two of them and they are the most versatile mic's I own. I've used them for snare drums, kick drums, guitar speakers, and live vocals. Definitely the best deal for your money. the next microphone I recommend buying is a large diaphragm condenser microphone. Now, these are a bit on the expensive side but they are well worth the investment.
I currently own the Marshall MXL V88. This is a gorgeous condenser mic that works wonders as a vocal mic, acoustic guitar mic, and an overhead drum kit mic. I've even used it to record electric guitar!
The last things that you're gonna need before you can finish your home studio are studio monitors. If money is tight and you can't afford a pair of studio monitors, then some quality studio headphones will work just fine. These items are perhaps the most overlooked out of everything, but the are essential because you need to have an accurate way of hearing your mixes that won't color the sound. Currently, I use a set of
KRK Rokit 5's. These are great for listening to your mixes because what you hear is what you get - there is absolutely NO sound coloration whatsoever when you use these. For those of you who can't afford these expensive monitors, then I recommend getting a pair of
AKG K 44 Headphones. At $50, these things give you a great and affordable way to mix your songs accurately!
Congratulations, now you have everything you need to start recording! The best part is, you did it under $500!
Assuming you have a computer and you've downloaded a free DAW, this sums up everything that is necessary to start your home studio:
- PreSonus Audiobox - $150
- Shure SM48 - $50
- Marshall MXL V88 - $200
- AKG K 44 Headphones -$50 =
_________________________________
GRAND TOTAL = $450
As always, thanks for tuning in,
-Cecil
 So if you've been keeping up with my posts, you probably have alot of questions regarding exactly what equipment I personally use to "record on a budget." In this article, I will go into detail about my home studio setup, as well as make recommendations to those just starting out. Continue reading to find out exactly how you can begin to build your very own home studio without breaking the bank!


No comments:
Post a Comment